2. Opening The Editor
Connect your site via secure FTP, add edit zones and you're ready to go.
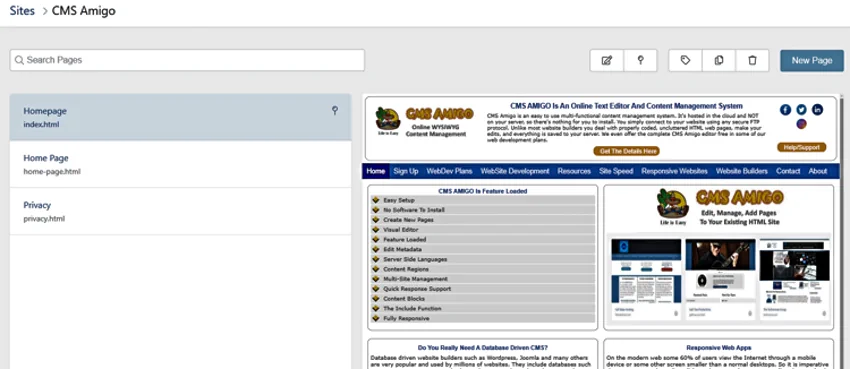
Once your site is loaded to your members area you will see the below interface in your client area.
On the left you will see a window that shows your website pages that you can edit. In the top right menu will see a pencil icon, click on it and the editor will open,

2. Using The Editor

Once you are inside the editor your page will open and show the editable areas you defined. The image below only shows the top header of the page. In the middle of the page you will see a popup menu (dark grey) with options that can be selected by clicking on the icons.
From the left to the right here is what these icons will allow you to do.
1) The icons that looks like a "q" will allow you to add a header (from h1-h7), a paragraph, formatted text or a blockquote.
2) The uppercase "B" allows you to bold text.
3) The uppercase "A" allows you to perform a variety of text formats.
4) The "paperclip" icon allows you to add a link.
5) The image icon allows you to add an image link, describe it and post it.
6) The "plus" icon performs a variety of functions. You can add video, a block, a code block and more. See the link to blocks in the side bar.
7) The "hamburger" icon allows you to align items
8) The "bullet" icon allows you to add a list.
9) To the right of the "bullet" icon you will find the "undo" and "redo" functions.
2. Using The Side Bar Menu
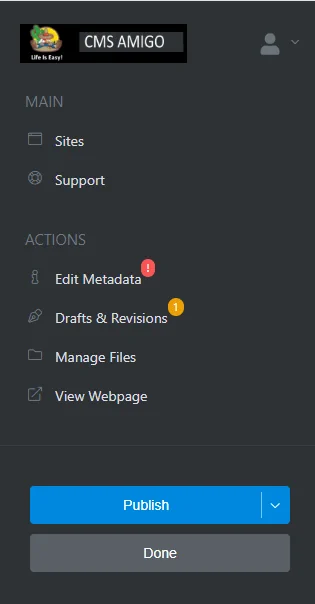
Within the side bar menu there are several functions available. These are described below this image.

From top to bottom here is what these links will allow you to do.
1) The sites link was discussed above.
2) The support link is actually this page. If you need more help, please complete the form in the left menu on this page.
3) The edit metadata link allows you to add or edit some od the meta tags between the <head section> tags on your webpage.
4) The Drafts & Revisions link provides an important function. If you are making some edits and want to either see how they look, or perhaps save the page to complete at later time, then this function allows you to do so.
5) The Manage Files link gives you direct access to your web server. You can upload, delete, and rename files.
You can also create new folders.
6) The "View Webpage" link opens your live page on your server.
7) The blue "Publish" button allows you view your live site or save it to CMS Amigo as a draft.
8) The grey "Done" button returns you to the site editor section.
Next Page - Edit Tags and Blocks


